Chickpea Pizza Crust (Egg-free!)

Screen Shot 2020-04-26 at 11.27.33 AM.png

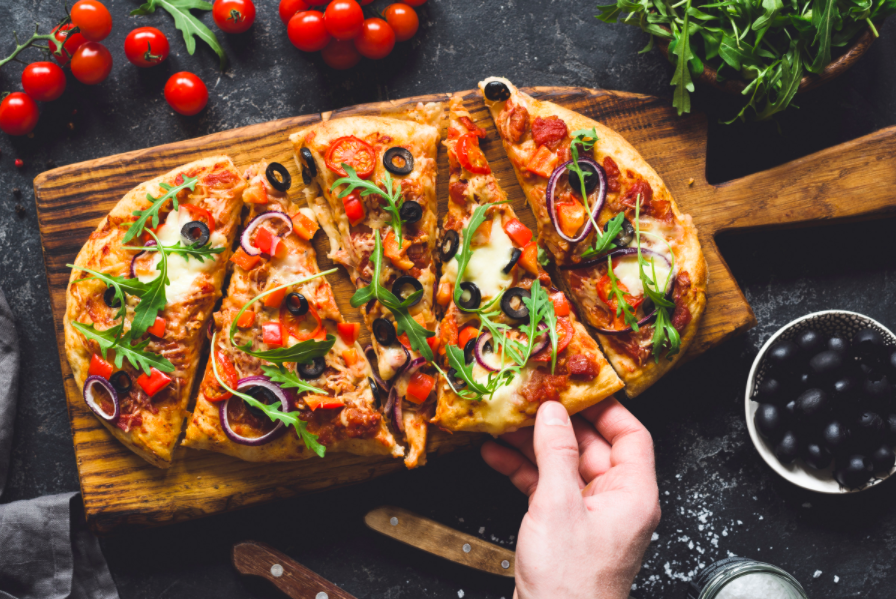
Yes, you read the title of this one right. A pizza crust made exclusively from a bean (as well as flaxseed for some binding support). Since the majority of my patients have many dietary restrictions, one of my major goals is to provide them with recipes that are delicious, nutritious, and free of any food intolerances. This is a recipe that is loved by many, due to its clean ingredient list that excludes all gluten, dairy, grains, and eggs.

You may be wondering how a pizza crust can possibly be made with just chickpeas, water, and some flaxseed? The magic is in the proportion of ingredients as well as one of my favorite egg substitutes, known as the “flax egg”. When ground flaxseeds are allowed to soak in water, they form a gelatinous and thick substance similar to an egg. This flax egg acts as an emulsifier by binding the other ingredients of this recipe to form a nice dough. This recipe is loaded with fiber, which helps regulate cholesterol, blood sugar, and healthy bowel movements. In addition, the chickpeas provide calcium, zinc, and Vitamin K, all of which promote healthy bone structure. It’s time for a new take on pizza that will nourish your body while treating your taste buds!

Ingredients:

  • 3 tbsp ground flaxseed

  • 6 tbsp water

  • 1 can of chickpeas (also known as garbanzo beans) strained and rinsed

  • 1.5 cups of chickpea flour

  • 1 tsp garlic powder

  • 1/2 tsp sea salt

  • 1/2 cup water

Instructions

1) Soak 3 tbsp of ground flaxseed in 6 tbsp of water and let sit for 5 minutes to form flax egg. Add all ingredients (including flax egg) to food processor and blend until a nice dough forms (feel free to add extra water if necessary).

2) Spread dough onto a pan lined with parchment paper or a pizza stone (brushed with coconut oil). Make sure to spread the dough thin.

3) Bake at 425 F for 15-20 minutes. Remove from oven and add preferred toppings (tomato sauce, spinach, olives, sautéed onion, arugula, basil, etc.). For dairy-based and dairy-free cheese toppings approved by Miss Alexa, please click here: https://www.missalexanutrition.com/fermented-foods

4) After toppings are added, place pizza back into oven and cook for another 10 minutes or until crust is to your liking. Enjoy!

Overnight Oats

Screen Shot 2020-04-19 at 12.57.22 PM.png

Overnight oats is a wonderful recipe for a delicious on-the-go breakfast option. One of the major concerns I hear from patients is that they need quick, healthy, and convenient recipes to keep up with their fast-paced and busy lifestyles. Overnight oats fits the bill since it can be prepared quickly the night before and provides your body with complex carbohydrates that will keep you fueled for hours as you start your day off.

When oats are soaked overnight, they contain less anti-nutrients including lectins, phytic acid, and enzyme inhibitors. All whole grains naturally contain these anti-nutrients, and soaking grains overnight was a common practice among our early ancestors. When anti-nutrients are removed from the grain, it allows our digestive tract to absorb more vitamins and minerals from the whole grain. This results in less bloating/digestive discomfort and more nutrition for us!

My overnight oats is packed with fiber, which allows for a slow and steady digestion of carbohydrates. This helps prevent blood sugar fluctuations and keeps you full for hours. My recipe is paired with yogurt and chia seeds to provide a nice thick texture and flavored with cinnamon and raisins for that hint of sweetness. You can also top your overnight oats with shredded coconut and any fresh fruit!

Ingredients:

Serves 1

  • ½ cup rolled oats

  • 1 tbsp chia seeds

  • 4 tbsp yogurt - for Miss Alexa approved dairy-based and dairy-free yogurt, please click here: https://www.missalexanutrition.com/fermented-foods

  • 2 tbsp raisins

  • 1 tsp cinnamon

  • 1 cup almond milk, unsweetened

  • Toppings: fresh fruit and unsweetened shredded coconut

Instructions

1) Place all ingredients into a small mason jar & shake until well combined.

2) Place in fridge and let sit overnight.

3) Eat cold, or heat if desired. Top with fresh fruit and shredded coconut. Enjoy!

Chocolate Avocado Pudding

Screen Shot 2020-04-12 at 10.57.52 AM.png

Avocado and cocoa powder are a nutritional match when it comes to desserts. The creamy texture of the avocado paired with the rich taste of chocolate will challenge your previous pudding recipes that called for processed dairy, corn-based thickeners, and refined sugar. Miss Alexa is giving the pudding world a makeover with two fruits and a legume. That’s right, eating healthy means keeping it simple.

This recipe is packed with potassium from the avocado and bananas and is an excellent source of heart-healthy monounsaturated fats. Potassium is necessary for regulating blood pressure and fluid balance while monounsaturated fats provide flexibility to the lining of our cells so that essential nutrients can enter. The cocoa powder provides polyphenols as well as flavonoids, both of which exert anti-inflammatory effects. The best part about this pudding recipe is that the carbohydrates and sugar from the bananas and maple syrup are balanced with healthy fat from the avocado. Prep time is minimal and the end result will have you fighting over who gets the last spoonful!

Ingredients:

Serves 2

  • 1 ripe avocado

  • 2 medium ripe bananas

  • 4 tbsp cocoa powder

  • 1 tsp cinnamon

  • 2 tsp vanilla extract

  • 1 tbsp maple syrup

  • 1 dash sea salt

  • Slivered almonds for garnish

Instructions

1) Add all ingredients to food processor or blender and blend until smooth.

2) Refrigerate for at least 2 hours and serve cold topped with slivered almonds. Enjoy!

Orange Chicken with Cauliflower Rice

Screen Shot 2020-04-09 at 9.15.17 AM.png

Orange chicken with cauliflower rice is a quick and pleasing recipe to make when you are craving Chinese food. This recipe is free of MSG, soy, processed vegetable oils, and gluten-based thickeners…all of which you would find in your typical restaurant-bought orange chicken. With the shelter in place due to the COVID-19 pandemic, we are all required to spend more time in the home and less time at social gatherings. This has given individuals all around the world the opportunity to spend more time cooking whole food recipes. Once you start cooking meals from scratch with simple and healthy ingredients, you start to realize all of the unnecessary and unhealthy ingredients that ready-made and convenient packaged meals contain. This is very eye opening and makes you pause for a moment to review exactly what you have been feeding your body on a daily basis. I would say the most common feedback I receive from patients who switch to preparing the majority of their meals from scratch is the difference in taste and satiety.

Whole foods pack a punch of flavor, especially when you know the right ingredients to use for each recipe. My orange chicken is flavored with orange juice, ginger, and coconut aminos, all of which have health promoting properties and a delicious taste. Ginger is a natural anti-inflammatory and has been shown to lower cancer and cardiovascular disease risk. In addition, ginger is wonderful for soothing an upset stomach and also helps with blood sugar regulation. Coconut aminos is the fermented sap from the coconut palm tree and is the perfect substitute for soy sauce, since 90% of soy in the United States is genetically modified. And the best part of this recipe? The rice is made exclusively from cauliflower, which you can purchase now at stores (in the fresh and frozen vegetable sections). We have transformed a heavily processed staple Chinese meal into a light and health promoting dish that will give you every reason to pat yourself on the back for making healthier choices.

Ingredients:

Orange Chicken:

  • 1 lb. boneless, skinless chicken breasts, chopped into bite-sized pieces

  • 2 tsp coconut oil

  • Sea salt and black pepper to taste

Cauliflower Rice:

  • 3 cups of riced cauliflower

  • 2 tsp coconut oil

  • 1/4 cup onion, chopped

  • 1/2 cup green peas (fresh or frozen)

  • 2 tsp coconut aminos

  • Sea salt and black pepper to taste

Sauce:

  • 1 cup water

  • 1/2 cup fresh orange juice

  • 1 Tbsp honey

  • 3 Tbsp coconut aminos

  • 1/2 tsp ground ginger

  • 2 Tbsp arrowroot or tapioca starch

Garnishing Options:

  • Toasted sesame seeds

  • Green onion (chopped)

Instructions

1) Rinse chicken breasts and pat dry. Cut into bite-sized pieces and season with sea salt and black pepper. Set aside.

2) Place all of the sauce ingredients in a medium saucepan over medium heat. Bring to a boil and allow sauce to thicken. Once the consistency is to your liking, remove from heat and set aside.

 3) Add the coconut oil to a skillet over medium heat and allow to melt. Cook chicken pieces for 5-7 minutes until browned. Remove any excess fat from pan, then add half of the sauce to the skillet. Mix well with chicken until warmed throughout. Remove from heat.

 4) Prepare cauliflower rice by heating your skillet over medium-high heat. Add 2 tsp of coconut oil and allow it to melt. Add the onion and cook for about 2-3 minutes. Now add peas and cook for 2-3 additional minutes. Now add the riced cauliflower and coconut aminos and cook for 5-7 minutes. Remove from heat and serve with orange chicken. Pour your remaining sauce over cauliflower rice. Garnish with toasted sesame seeds and green onion.